Connecting Webflow Optimize and PostHog
A simple way to track engagement in Webflow Optimize.
Recently, we ran an A/B test on a client’s homepage. Two versions of the hero copy, with the same layout.
Webflow Optimize split the traffic, waited until it had enough data, and told us which version won.
The result was useful, but it left us with a few questions.
Did people stay longer? Scroll further? Interact with one version more than the other before they converted?
Webflow Optimize told us which variation won. It didn’t tell us why.
The client was already using PostHog, which was collecting all of the engagement data we cared about. It just had no idea which variation each visitor had seen.
The missing piece was getting the variation data from Optimize into PostHog.
Why two tools
Webflow Optimize runs the test
Splits traffic between variations, measures conversions, and picks a winner.
PostHog explains the winner
Shows how people actually behaved in each variation.
Webflow Optimize and PostHog solve different parts of the same problem.
Webflow Optimize handles the experiment itself. It creates the variants, splits traffic between them, tracks conversions, and determines when there’s enough data to declare a winner. For measuring outcomes, it does exactly what it needs to do.
The limitation is that Optimize only tells you what won. It does not tell you why.
That is where PostHog comes in. Once installed, it automatically captures user behaviour across the site, including clicks, scroll depth, time on page, and navigation paths. You can see how visitors interact with a page long before they convert or leave.
But PostHog has the opposite limitation. It can see the behaviour, but it has no awareness of the A/B test running in Optimize. From its perspective, all visitors belong to the same audience, regardless of which variant they saw.
So each tool only gives part of the picture. Optimize knows which variant a visitor saw but not how they interacted with it. PostHog knows how visitors behaved but not which variant influenced that behaviour.
Once the two are connected, we can break down clicks, scrolls, time on page, and conversions by variation.
The idea
The integration is pretty simple.
When Webflow Optimize assigns someone to a variation, we pass that information to PostHog.
From that point on, every event PostHog captures for that visitor includes the variation they saw.
That’s possible because Webflow Optimize exposes the assigned variation through its browser API. As soon as a variation is chosen, the API gives us its name and ID, which we send straight to PostHog.
The setup
Step 1 - Get your Optimize test running
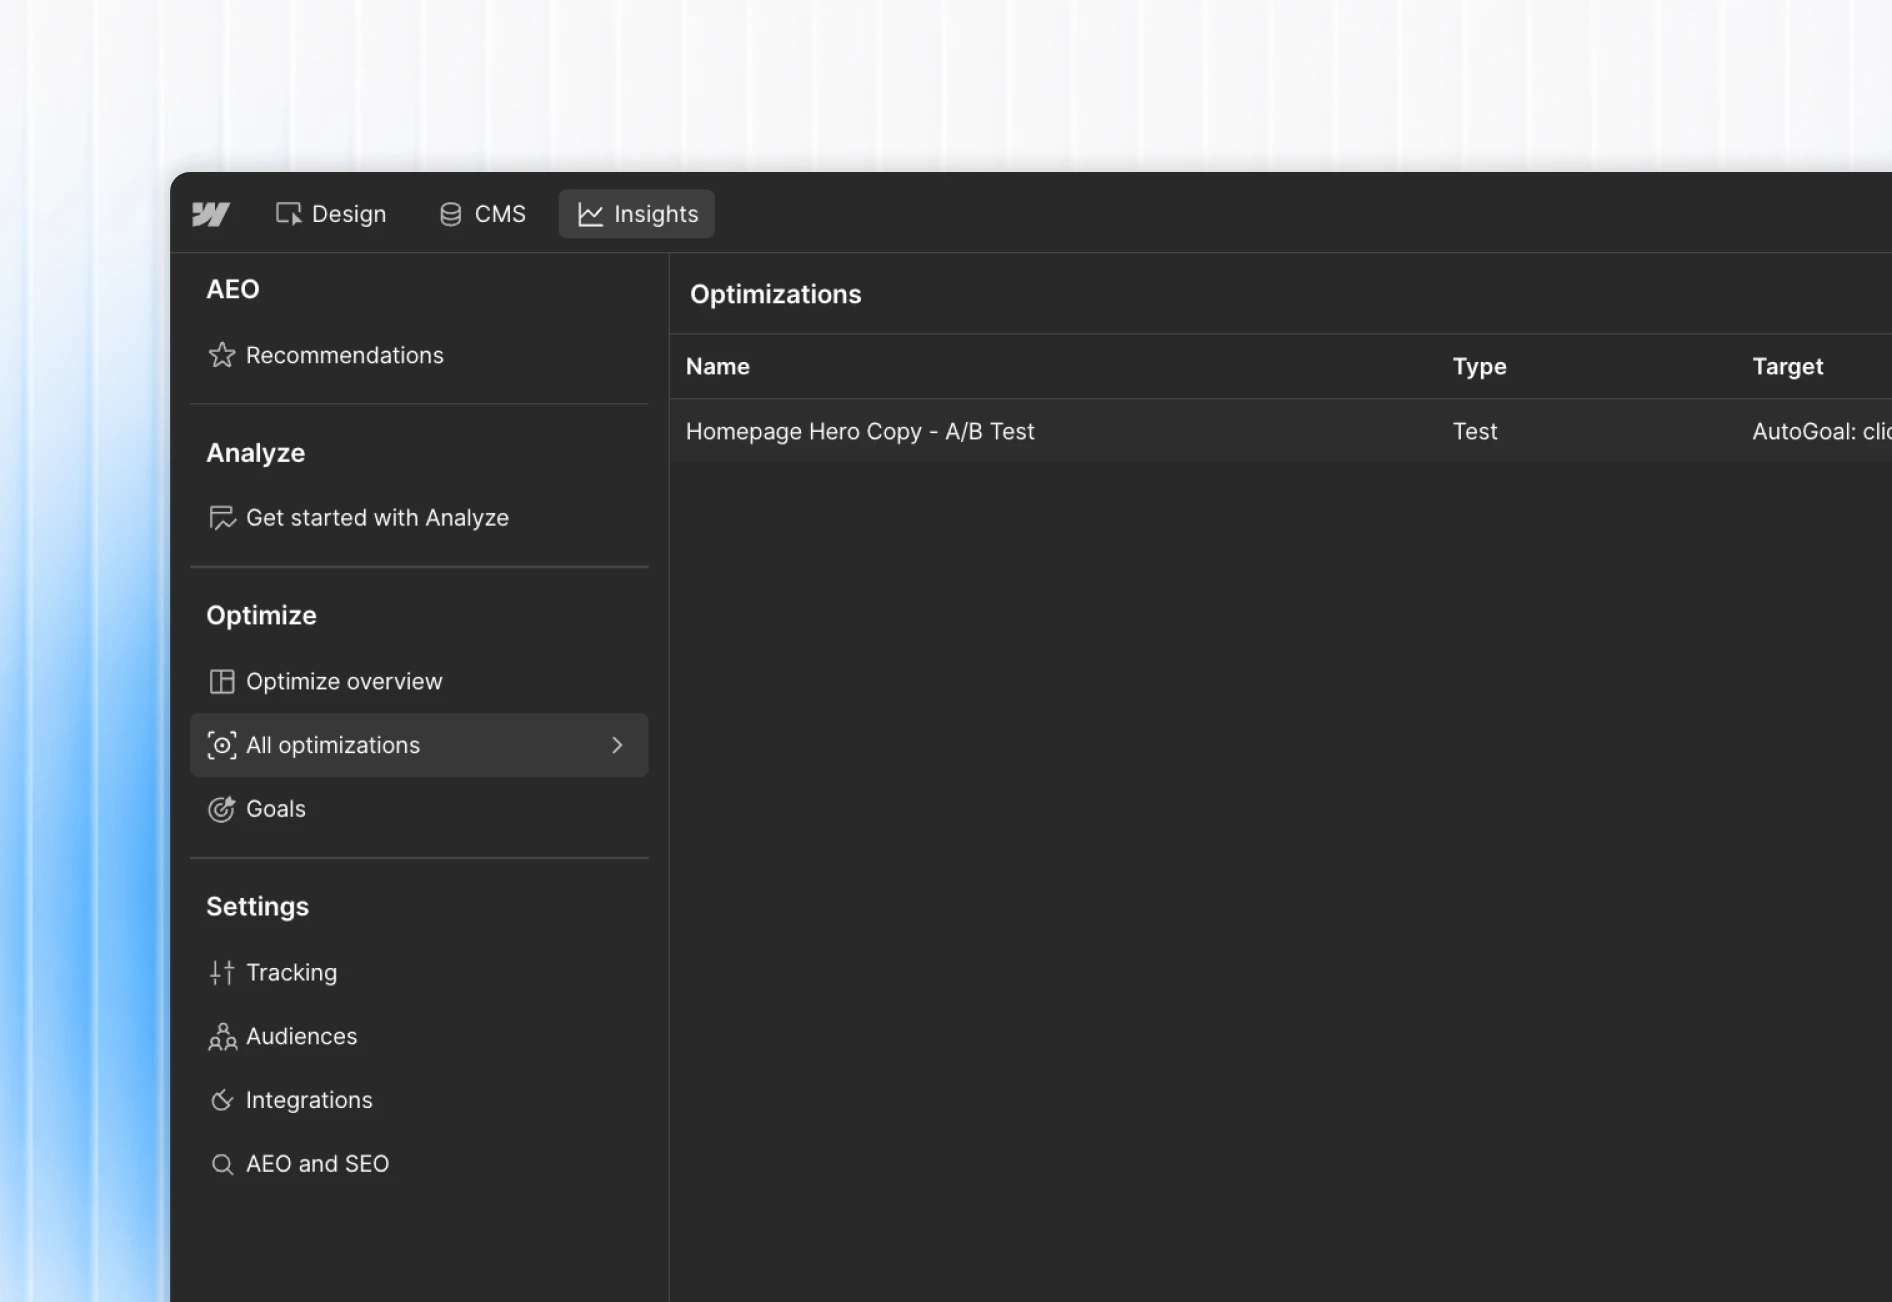
Before anything else, you need a Webflow Optimize test live on the site. Variants set up, traffic splitting between them, a goal chosen.
If you haven’t set one up yet, Webflow’s guide on creating a test optimization walks through the whole thing.
This comes first for a simple reason. The script we’re adding listens for Optimize handing someone a variant. Until a test is actually running, there’s nothing for it to hear.
Step 2 - Make sure PostHog is on the site
Next, PostHog needs to be installed. If you’re not sure whether it is, open the site, open your browser console, and type posthog. If it returns an object, you’re set, skip to Step 3.
If it’s not there yet, it’s a quick add:
- In PostHog, open your project settings and copy the web snippet.
- In Webflow, go to Site Settings, then Custom Code, and paste it into the Head Code.
- Publish, then reload and check the console again.
PostHog’s install guide has the full version if you want it. Once posthog shows up in the console, you’re ready.
Step 3 - Add the integration script
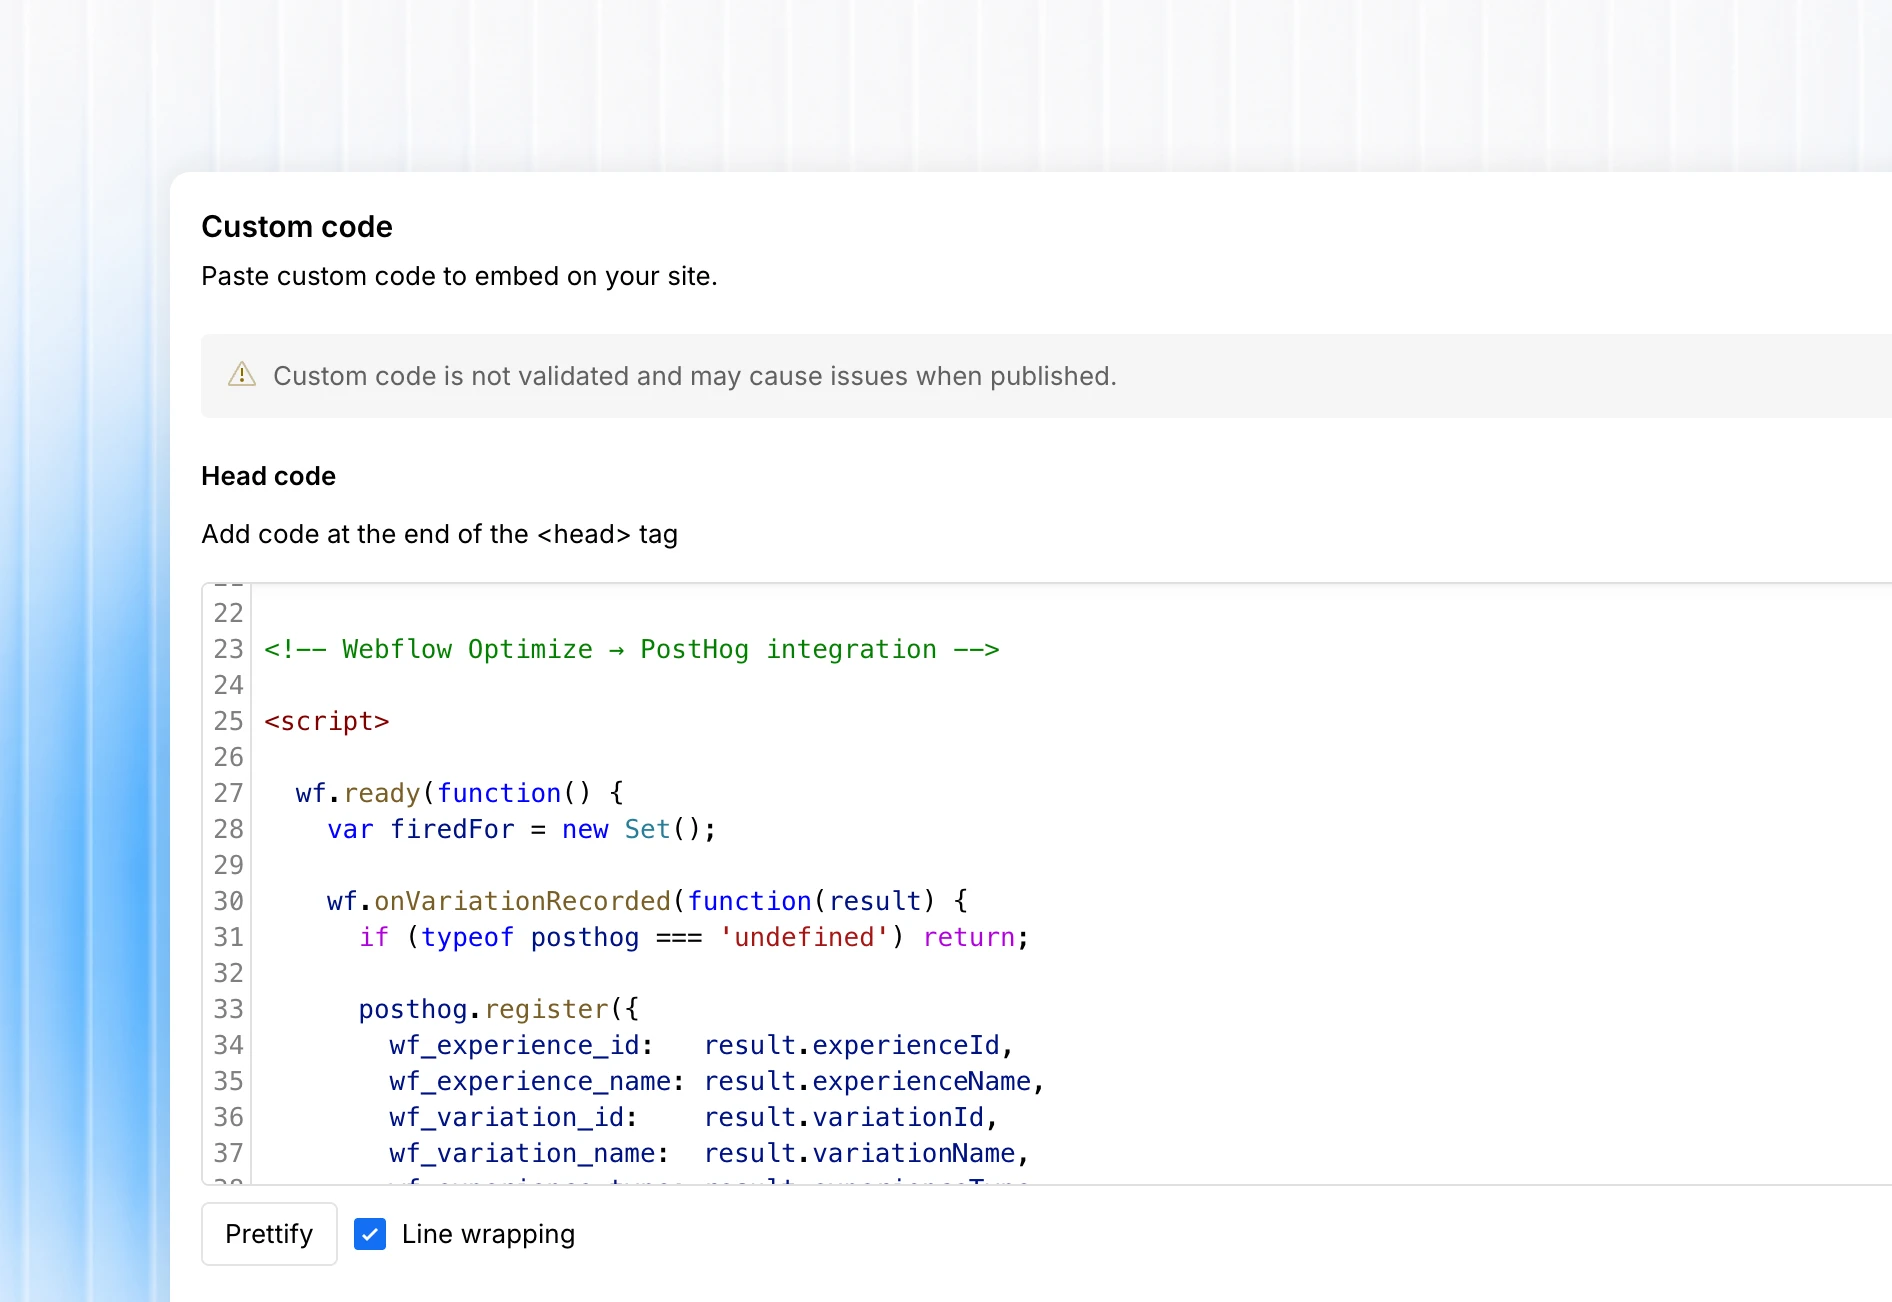
In Webflow, go to Site Settings, then Custom Code, then Head Code. Paste this in, after the PostHog snippet and before the closing head tag:
<!-- Webflow Optimize → PostHog integration -->

<script>

  wf.ready(function() {
    var firedFor = new Set();

    wf.onVariationRecorded(function(result) {
      if (typeof posthog === 'undefined') return;

      posthog.register({
        wf_experience_id:   result.experienceId,
        wf_experience_name: result.experienceName,
        wf_variation_id:    result.variationId,
        wf_variation_name:  result.variationName,
        wf_experience_type: result.experienceType
      });

      if (firedFor.has(result.experienceId)) return;
      firedFor.add(result.experienceId);

      posthog.capture('webflow_variation_exposed', {
        experience: result.experienceName,
        variation:  result.variationName
      });
    });
  });
</script>
That’s all of it. The next step is just understanding what it does.
Step 4 - What the script does
It’s worth knowing what each piece is doing, so here’s the script in plain terms:
wf.ready waits until Webflow’s browser API has loaded before running anything. The API arrives just after the page, and running too early would miss variants recorded in that gap. It’s also why the script sits in the head, listening before any variant is shown. Webflow recommends the same.
onVariationRecorded is the hook. It fires once Optimize has applied a variant and shown it to the visitor, handing over a result object with the variant’s name, ID, and experience details. The rest of the script just passes that to PostHog.
register attaches the variant to PostHog as a super property, so it rides along on every event that visitor sends. It persists across sessions, and that’s deliberate. A conversion can happen on a later visit rather than the same one, so you want a visitor’s events to keep carrying the variant they were first shown, even days later. If the tag cleared when the session ended, you’d lose the link between the exposure and a delayed conversion.
The tradeoff is that the property stays set until it’s overwritten, so if the same visitor later enters a different test, more than one variant tag can be present at once. That’s why every insight is filtered by experience name (Step 7). It keeps each test reading only its own events, so an old tag can’t quietly bleed into a new test’s numbers.
The firedFor Set is a safeguard. You can end up processing the same exposure more than once, so the Set remembers what’s fired and skips the repeat, keeping the exposure count honest.
Step 5 - Publish
Custom code only runs on the published site, not in the editor or preview. So, publish the site to make it live. If you’re testing and nothing seems to happen, this is the first thing to check.
Step 6 - Test that it works
Two quick checks.
The console check
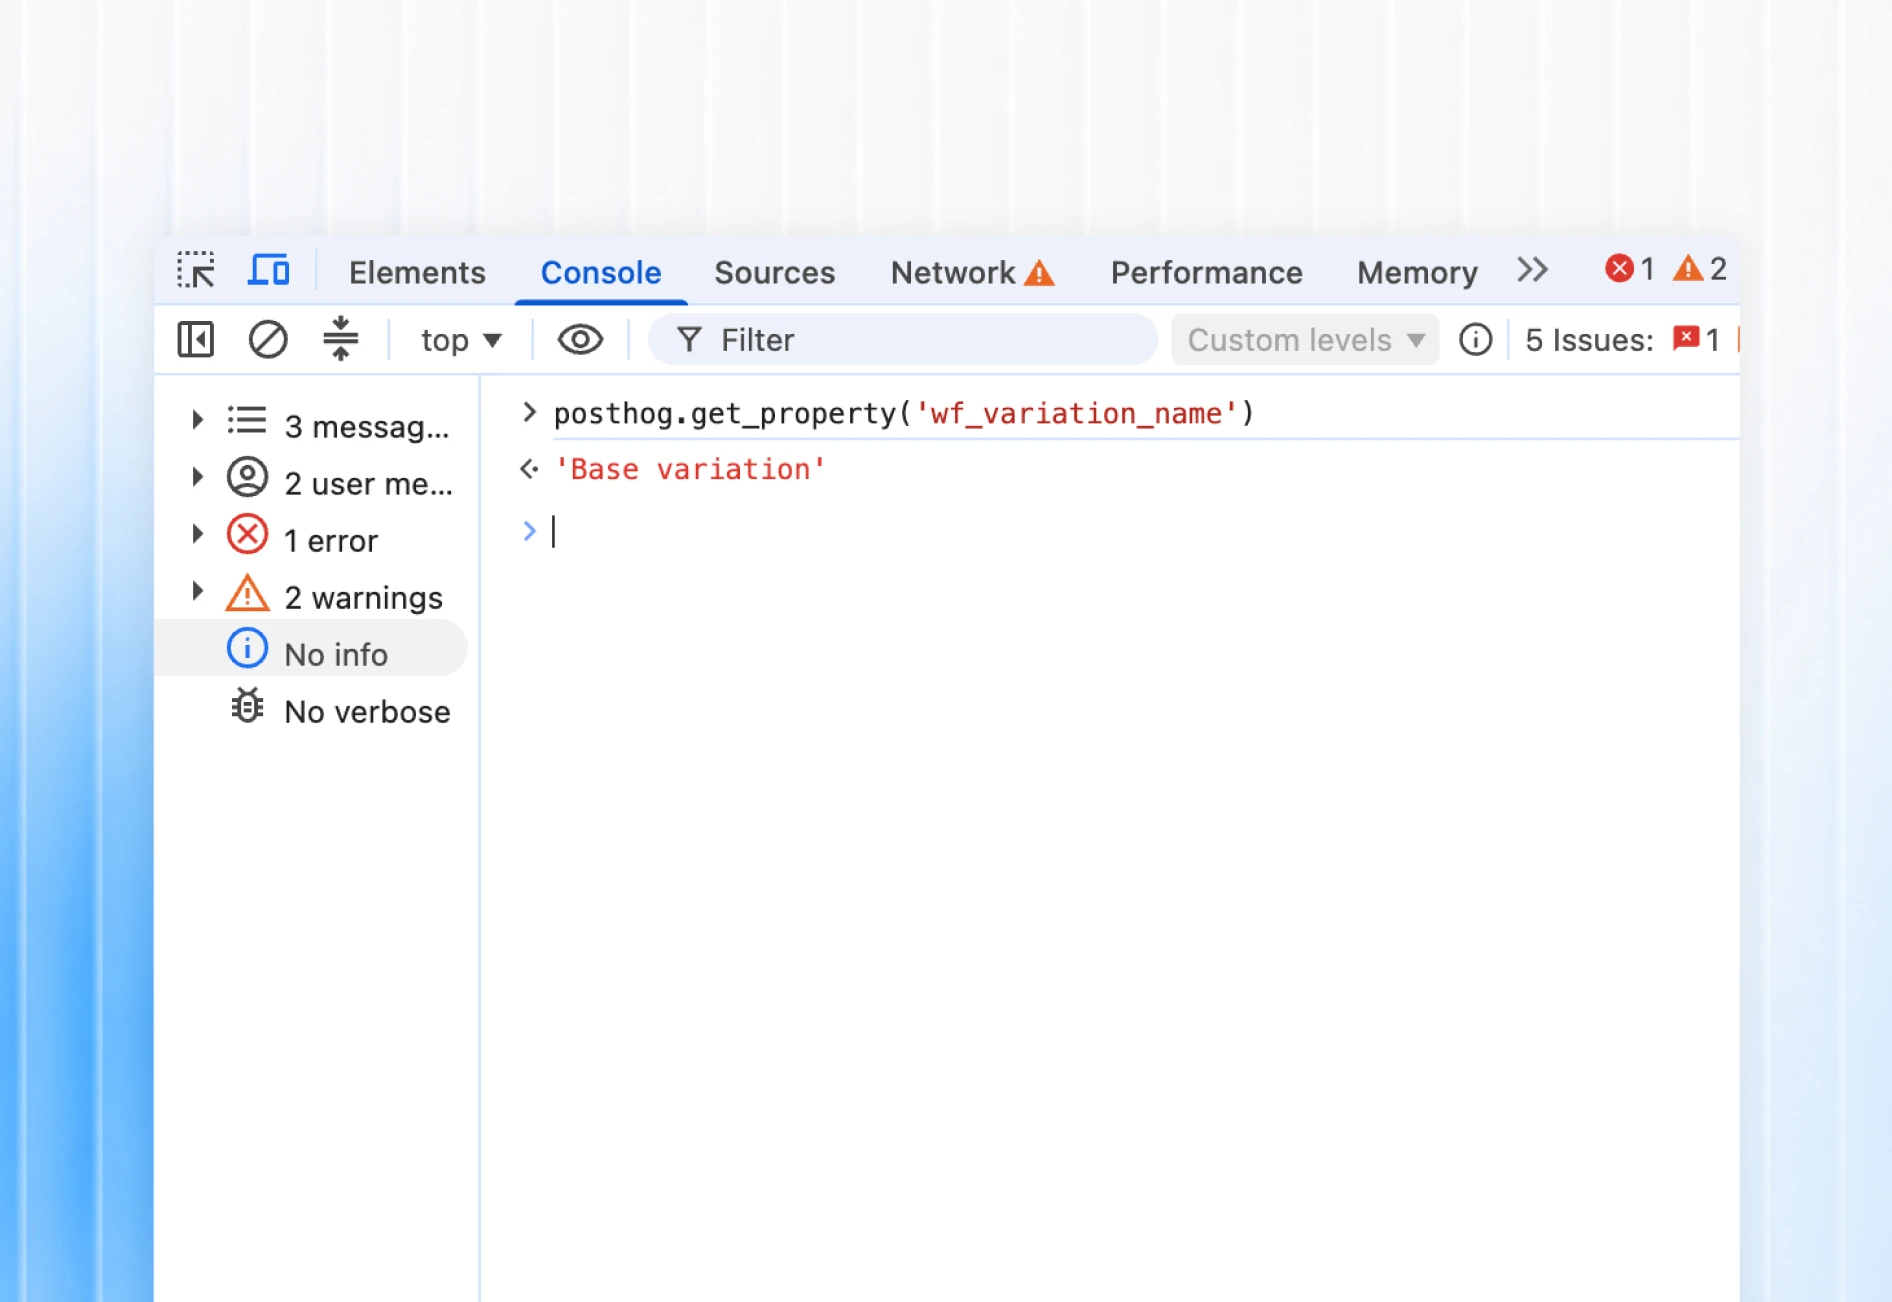
Open the published site in an incognito window with the console open. Once the page has loaded, paste:
posthog.get_property('wf_variation_name')If the integration is working, it returns the variant the visitor was assigned, something like 'Base variation'. That confirms the variant made it from Optimize into PostHog and is now attached to the visitor.
If it returns undefined, the variant didn’t get registered. Check that the script is in the head rather than the footer, and that PostHog is loading before it.
The PostHog check
In PostHog, open Live Events and browse the page. You should see events coming in with the wf_ properties attached, like wf_variation_name. Try it across two or three incognito sessions so you catch both variants landing.
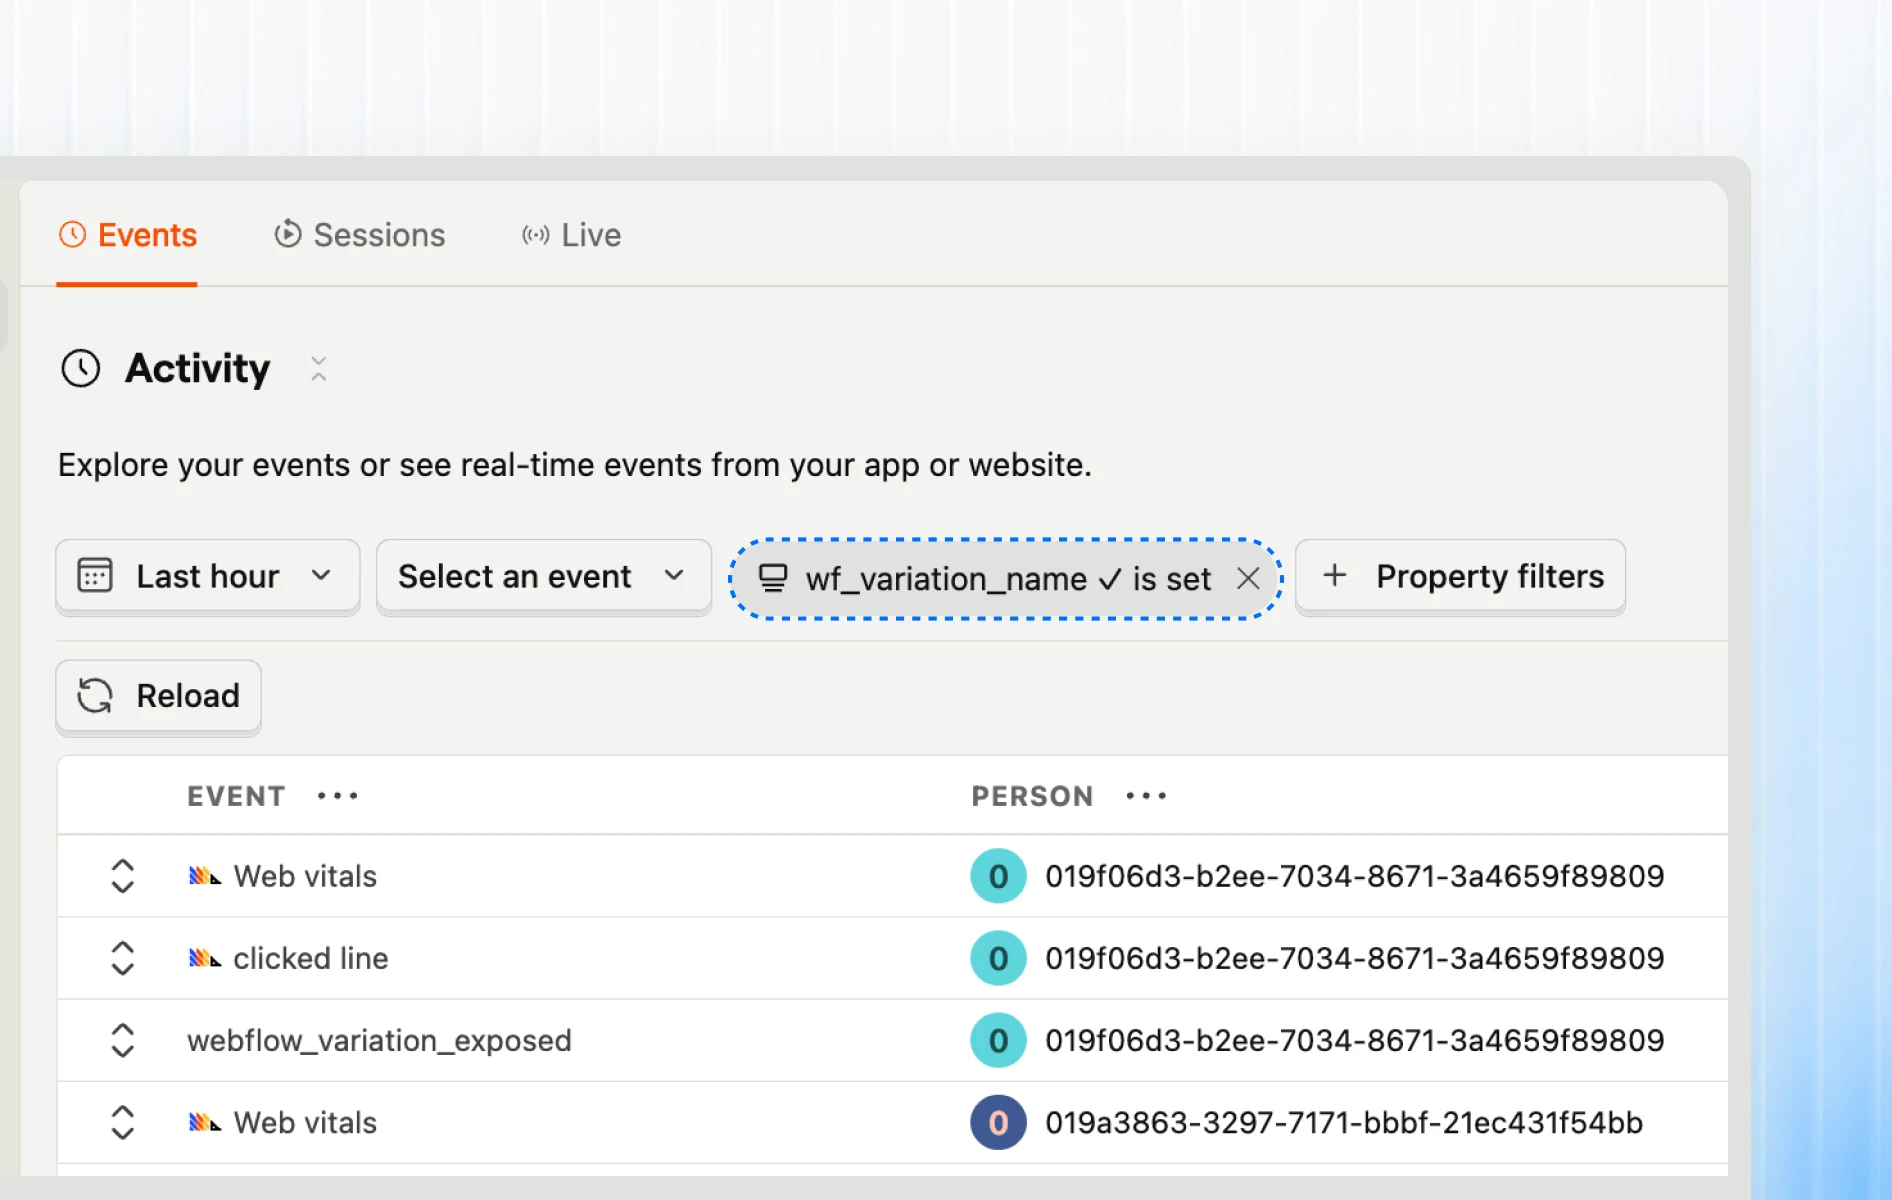
Once you’ve seen the variant properties on real events, the integration is working.
Step 7 - Build a dashboard for the test
The events are tagged now, but raw events don’t tell you much on their own. To make sense of the data, create a dashboard for the test: in PostHog, go to Dashboards, click New dashboard, and name it after the experiment.
Before creating any insights, there are two things to keep in mind.
First, filter every insight by the test’s experience name. Because the variant persists across sessions, this filter is what keeps one test’s events out of another’s, so always apply it. “Experience” is just Webflow’s word for a single test, and the script saved its name as wf_experience_name on every event.
Second, engagement properties in PostHog describe the page someone just left, not the page they’re currently on. That’s why you’ll be using properties that start with $prev_pageview, such as $prev_pageview_pathname and $prev_pageview_duration.
One more filter worth adding to every insight: wf_variation_name is set. The very first event of a session can fire a moment before the variant tag is registered, so this quietly drops those few untagged stragglers and keeps the numbers clean.
Let’s create these basic insights in PostHog and add them to the custom dashboard you created for this A/B test.
Median Time on Page
How long did people actually stay?
- Event:
$pageleave - Math: Median of
$prev_pageview_duration - Filters:
$prev_pageview_pathnameequals your page,$prev_pageview_duration <= 1800, andwf_variation_name is set - Breakdown:
wf_variation_name
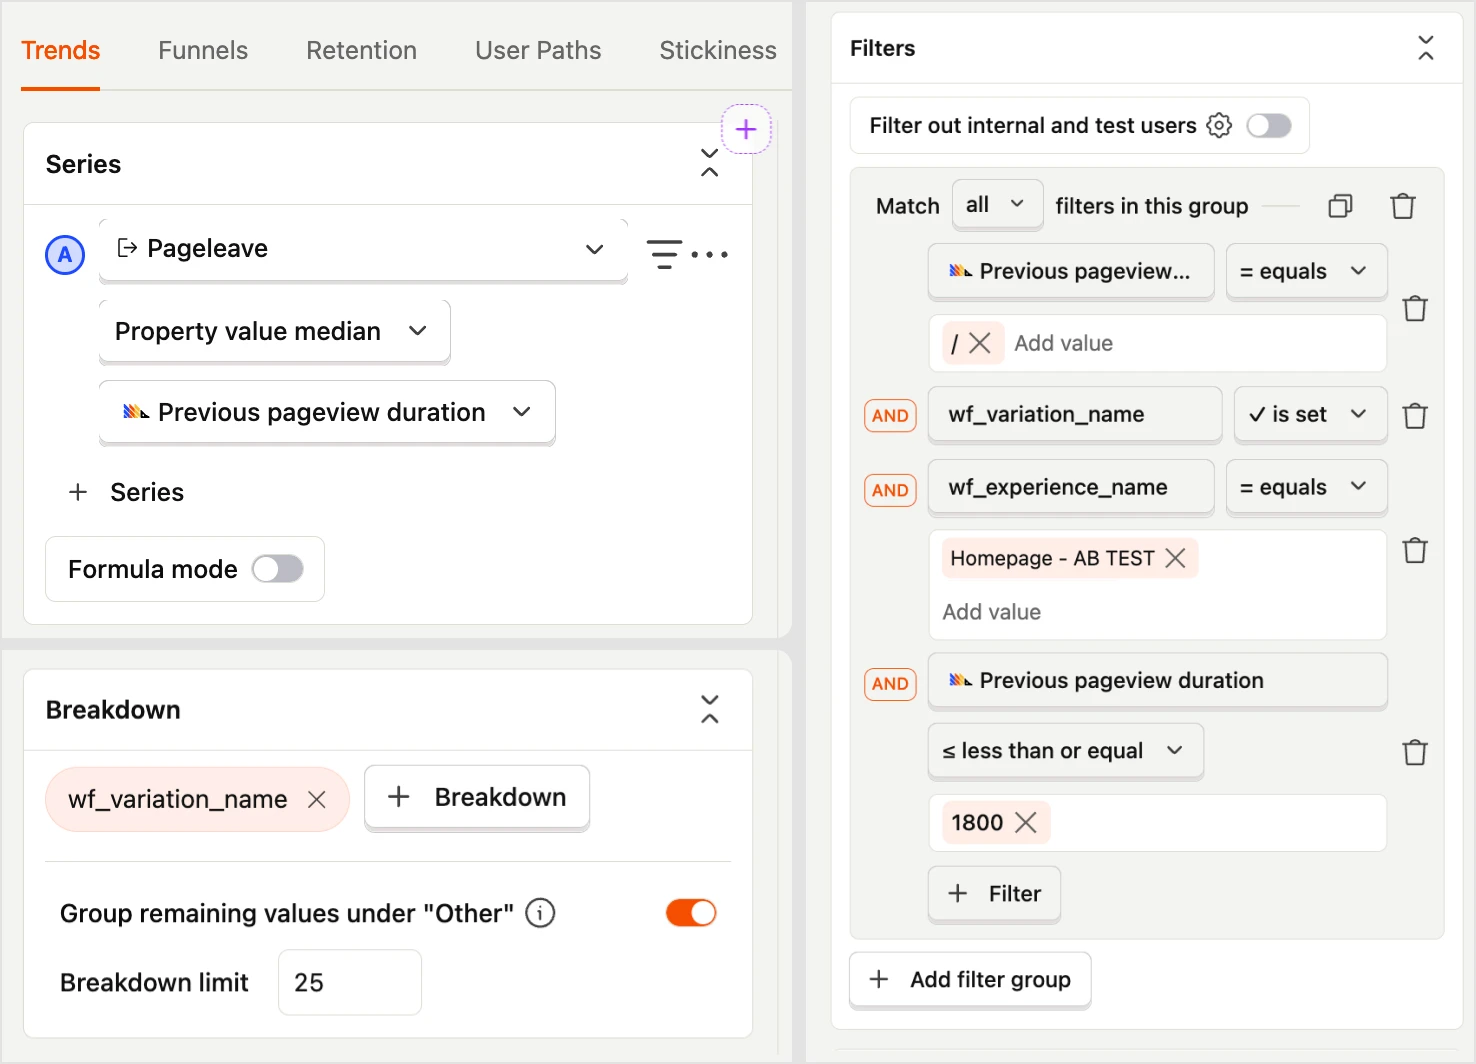
Use the median rather than the average. It handles outliers much better. Someone leaving a tab open for hours won’t distort the result.
A note on the event. This uses $pageleave, which fires when someone closes the tab or leaves the site. People who click straight through to another page on the site are the exception, their time lands on the next $pageview instead. In practice enough sessions end on $pageleave to give a solid read, just know the number leans slightly toward people who left from the page rather than navigating deeper.
Deep Scroll Rate
How many people made it most of the way down the page?
- Event:
$pageleave - Math: Unique users, shown as a percentage of unique users
- Filters:
$prev_pageview_pathnameequals your page,$prev_pageview_max_content_percentage >= 0.9, andwf_variation_name is set - Breakdown:
wf_variation_name
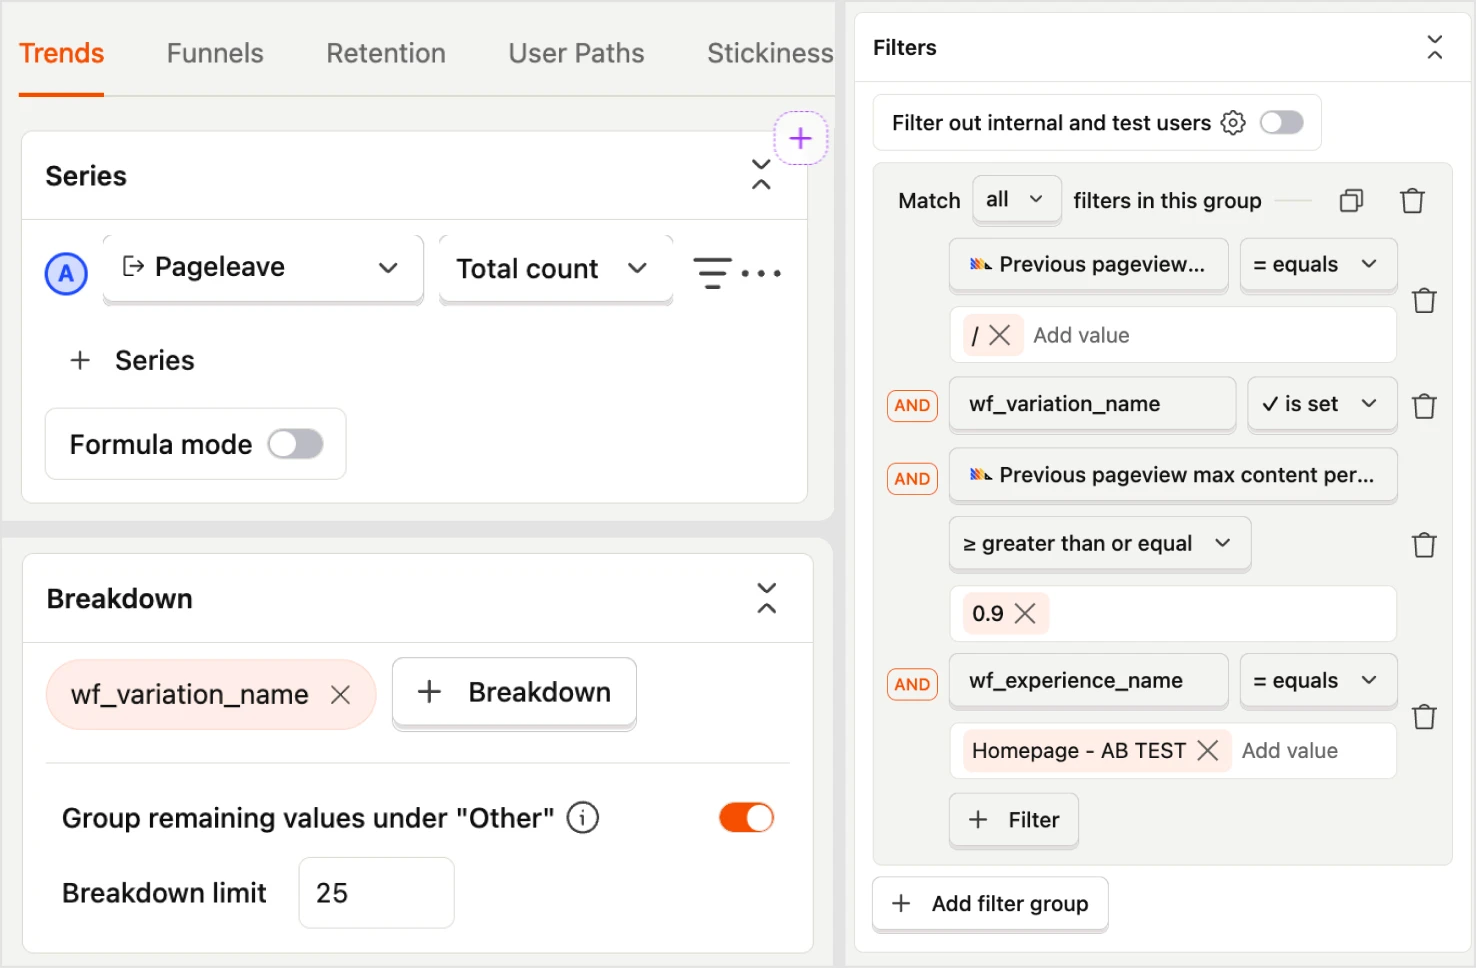
Use a percentage rather than a count. One variant may receive more traffic than another, which makes raw numbers difficult to compare.
From there, the pattern stays the same. Filter by experience, break down by variant, and build whatever insight you need. Time on page, click rates, funnels, and conversions all follow the same approach.
Once the setup is in place, you won’t need to touch it again. Future tests will flow through the same script, and all that’s left is building a dashboard for each new experiment.
The tricky parts
A few things to watch out for:
Consent banners reduce your sample size
If your site has a cookie banner, not every visitor will end up in the test.
Webflow Optimize only assigns variants to visitors who consent to analytics. Anyone who declines is excluded from the experiment.
That means your actual sample size can be much smaller than your total traffic. Nothing is broken. It’s just something to keep in mind when a test takes longer than expected to reach significance.
Compare percentages, not counts
Raw numbers can be misleading.
If one variant receives more traffic, it will naturally generate more clicks, more deep scrolls, and more conversions.
Instead of comparing totals, compare percentages. That gives you a much better picture of how people behaved after seeing each variation.
Give the test enough time
Engagement numbers can change a lot when the sample size is small.
During the first few days, use PostHog to make sure the integration is working, not to judge the test. Let Webflow Optimize decide when there’s enough data to call a winner. Use PostHog to understand why that variation won.
We used PostHog because it was already running on the project.
But the idea isn’t really tied to PostHog.
Once you have the variation from Webflow Optimize, you can send it to whatever analytics tool you’re already using.
Either way, the test no longer stops at the winner. It tells you why.